Q-Plus Labs

Sitemap | Contact Us 

Dimensional Measurement Blog

Q-PLUS Labs' Case Study: Extreme Components, LP's Surface Finish Analysis of DAT Mold Interlocks

Posted by Mike Knicker on Aug 12, 2016 12:47:02 PM

 banner_extreme-components.jpg

Extreme Components, LP is known for designing and creating cost-saving, effective alignment/positioning devices for the Injection Mold Industry that are durable, reliable, and high precision. Their molding alignment locks are manufactured using dynamic alignment technology or DAT, which is a revolutionary method for self-aligning locks that involves minimal friction and wear, even at high speeds. Using Q-PLUS Labs’ nano measurement expertise, Extreme Components, LP wanted to use the surface finish analysis results to find out precisely how well their DAT locks held up against the wear of daily use versus the traditional friction-fit locks.

Introduction

Extreme Components, LP's unique product was designed using DAT which consists of rollers constrained in a cage, and moving in a prescribed manner due to the kinematic relationship between the rollers. The tongue is moved relative to the housing without direct mechanical contact between the tongue and the housing. Because there is very minimal friction between parts, the process decreases the amount of wear that would normally be experienced using methods such as those used with traditional friction-fit locks.

Our Process
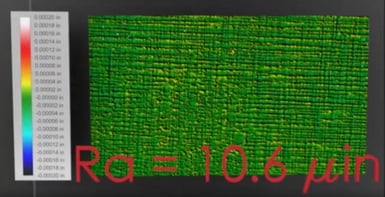
Color_Map.jpgTo analyze the exact amount of wear, Q-PLUS Labs performed a surface roughness analysis to confirm the wear on the unused surface of a traditional friction-fit lock versus the wear experienced by Extreme Components LP’s DAT locks after multiple uses. This was accomplished using white light profilometry from CyberTechnologies’ CT 300. The subsequent data from the unused surface of a friction-fit lock revealed an average roughness of 10.6 micro inches. There was major deviation from the level surface while the actual tongue contact surface was too rough to measure using conventional high precision instruments due to galling, or wear caused by adhesion between sliding surfaces, which could be observed from visual inspection.
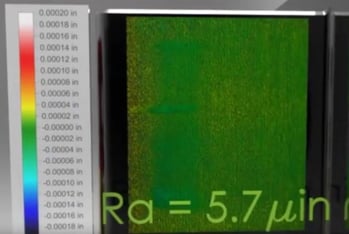
Color_Map_EC.jpgIn comparison to the friction-fit lock, Extreme Components’ DAT lock that had been used by a multinational medical device manufacturer for 4 years of near continuous service, cycling every seven seconds with a 2,300 pound load yielding more than 10 million cycles, was measured to have a surface roughness of only 5.7 micro inches. The data of the surface map displays better uniformity than the friction-fit lock, and visual inspection shows the DAT lock’s mirror-like surface and no galling.

Usually, this measurement was done using far less accurate and time consuming means. However, with the rapid and accurate surface finish analysis data Q-PLUS Lab’s provided, Extreme Components was not only able to effectively compare their DAT locks to traditional friction-fit locks, but visually show customers the value of how their product holds up in real use scenarios.

 
New Call-to-action


Read More

Topics: manufacturing, 3D scanners, 3D Scanning, 3D scanning equipment, case studies, nano measurement,, CT300, nano

11 Dimensional Inspection Equipment Factors to Consider Before Purchasing

Posted by Mike Knicker on May 7, 2013 2:30:00 PM

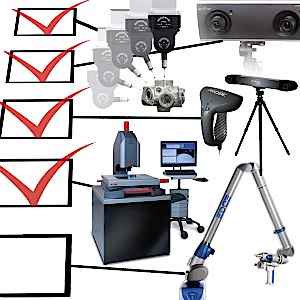
11 dimensional inspection factorsPurchasing dimensional inspection equipment requires making a big decision, and in most cases a significant financial investment. It is important to be certain that the equipment you buy will serve its intended purpose and provide the results you need.
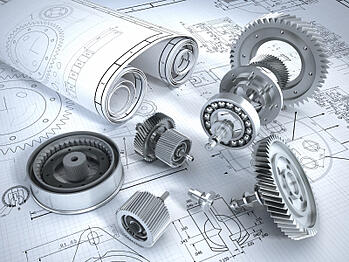
Because there are so many different types of equipment that can be used for a broad range of purposes, it helps to know what questions to ask before you buy.

11 Dimensional Inspection Equipment Questions You Need to Ask

  1. What sensor type do you need?

    Depending on the surface characteristics of the objects you intend to measure, you may need either a contact sensor or a non-contact sensor. Within each of these two categories are several other options and different sensor types. The more you know about the objects you will be measuring, the better able you will be to select the right types of dimensional inspection equipment.

  2. What tolerance levels are required for your application?

    There is a big difference between replicating an antique to sell in a gift shop and mass producing components that will be used in a medical device. In the former case, a certain amount of inaccuracy is tolerable, while in the latter case the requirements are more stringent. Make sure you know how precise you need to be, especially if you have to maintain regulatory compliance.

  3. Does your equipment need to be portable?

    Do you need a machine that will always sit at the end of a production line, or do you need a more portable unit that can take measurements in the field?

  4. What size(s) are the objects you need to measure?

    Some objects are small enough to be put into a machine, while others are simply too large or heavy. On the other hand, objects that are on the nano scale will require specialized equipment.

  5. What shape(s) are the objects you need to measure?

    Does your object have internal geometry that you need to measure? Bore holes, threads, and other complex geometry cannot always be measured by certain types of dimensional inspection equipment or without certain accessories.

  6. How fast do you need results?

    Measuring the occasional prototype is a different scenario than inspecting every component that comes off a production line. It is important to know how quickly you will need results so you can purchase a machine that is capable of meeting your needs.

  7. Does your equipment need to be automated?

    Some dimensional inspection equipment can be automated, but not all of it can be. If this is an important factor for your application, make sure it is a high priority in your purchasing decision.

  8. Who will be using the equipment?

    Ease of use should be considered if you are weighing multiple options. Will you need to hire new staff or train employees to use this new equipment? Does your budget support that?

  9. What is required to maintain the equipment?

    High-precision measurement equipment needs to be properly set up, regularly maintained, and periodically calibrated. Does your staff have the skills to do this, or can you outsource it?

  10. How durable and reliable is the equipment?

    Dimensional inspection equipment is an investment. It is important to compare multiple manufacturers and work with an expert who has experience will all of them.

  11. What is your budget?

    Perhaps one of the most important factors is your budget, however, be sure to weigh all of the above before you make a decision.

If you would like to learn more about selecting the right dimensional inspection equipment for your application, download our free guide. You can also schedule a consultation with one of our dimensional inspection experts who can walk you through the entire process. Contact us today to schedule an assessment.

What type of dimensional inspection equipment are you looking for?

Read More

Topics: manufacturing, dimensional measurement, dimensional inspection, equipment, budgeting, project planning, measurements, criteria, metrology, dimensional inspection equipment

What Are The Types of Reverse Engineering and Why Does it Matter?

Posted by Mike Knicker on Nov 8, 2012 2:58:00 PM

reverse engineering typesReverse engineering can be used for a broad range of applications, from precisely duplicating an airplane part that is no longer manufactured to making a mold to replicate an antique statuette. The type of reverse engineering required will depend on the specific application and the necessary degree of precision. Knowing these factors in advance can help you determine the type of reverse engineering that makes the most sense so you can get useful results and make the appropriate budget decisions.

Exploring two extreme ends of the spectrum illustrates the difference between reverse engineering types and why it is important to understand them.

Case 1: Precision is important

Various factors are considered when determining the best method for reverse engineering. Take the example of an aircraft part or biomedical device. You have the original part, but no design specifications. In this case, the following factors are considered:
  1. Original object - Because having a high degree of precision is important, several original parts are required to generate the most accurate duplicate part. These several parts will be measured and compared; the average measurements are typically used to replicate the part.
  2. Tolerance - This represents the range of measurements that are acceptable. When working with a regulatory body such as the FAA or FDA, you generally must stay within a certain allowable deviation.
  3. Accuracy - A high degree of accuracy is required to meet the desired function of the part.
  4. Measurement approach - Many types of measurements using various contact and non-contact sensors will be taken with either a low-density ordered data or high-density data approach, possibly with millions of points to get the most accurate and detailed information possible.
  5. Purpose - You may want to create new tooling or parts for a high-precision application, or duplicate a part for which you do not have existing specifications. The result might be parametric CAD models, 3D mesh files, or engineering drawings that can be used for manufacturing.
Case 2: Precision is less important

When replicating an object that is not subject to regulatory scrutiny, a less strict approach can be taken. The same factors apply, but they are handled differently:
  1. Original object - Generally only a single original object is required.
  2. Tolerance - The tolerance levels may not be important at all, making the measurement requirements significantly less onerous.
  3. Accuracy - The original object may have a more free-form geometry that does not require the same degree of accuracy.
  4. Measurement approach - Only 3D scanner measurement data may be required to generate a suitable duplicate and engineering drawings are generally not required.
  5. Purpose - You may want to get a digital representation of a product for a marketing video or reproduce products for manufacturing. The result might be a 3D mesh or non-parametric CAD model that can be sent to a rapid prototyping machine and also allows you to compare reproductions to the original.

Of course, there are a broad range of examples that fall between these two ends of the spectrum. A good reverse engineering lab can help you determine which reverse engineering approach is right for your project.

If you need reverse engineering services, contact the experts at Q-PLUS Labs. We provide 3D scanning & digitizing, precision CMM measurement, 3D CAD modeling, and engineering drawing services to help you reverse engineer any type of part. Contact us today to learn more about our services.

Read More

Topics: manufacturing, quality, dimensional inspection, reverse engineering, measurements, engineering

Five Common Manufacturing Errors Stopped By Dimensional Measurement

Posted by Mike Knicker on Oct 26, 2012 9:15:00 AM

dimensional measurement common manufacturing errorsDimensional measurement is useful for much more than just production line setup and quality control. Manufacturing businesses can also greatly benefit from dimensional measurement in both prototypes and research.
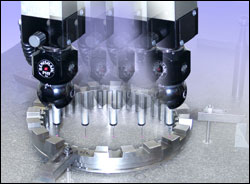
Dimensional inspection during the production process can help prevent costly errors such as:
  • Flawed batches - A production line that creates duplicate products requires precision setup and alignment. Errors in the production line can lead to entire batches of flawed goods, which can be quite costly for business owners. Dimensional measurement is worth the investment to prevent these expensive mistakes.
  • Defective parts - Using dimensional inspection as part of the quality control process for high-precision manufacturing ensures that each part meets the required specifications.
Quality control is essential for producing consistent products, but implementing dimensional measurement even earlier in the process can help you prevent costly manufacturing errors that can lead to the following problems:
  • Friction - Using a part that is just a little too large can result in friction, which leads to a shorter equipment life and possibly even greater problems. Using dimensional inspection to create properly sized parts can help prevent this problem.
  • Stiction - Surface characteristics and size of manufacturing components can be very important in preventing stiction problems that may cause motors to work harder and become less efficient. Ensuring that a component is properly sized and has the specified surface characteristics can reduce errors caused by stiction.
  • Mechanical stress - Improper alignment can put unnecessary stress on ball bearings and moving parts, causing more wear and tear on the machinery and possibly leading to equipment failure. Laser alignment can help prevent this problem and lengthen equipment life.

The entire point of manufacturing is to create a process that is repeatable, scalable, and reliable. When successful, it results in lower manufacturing costs and lower pricing for the end user. However, precise, accurate measurements are required for any manufacturing line to be successful.

Q-PLUS Labs offers a broad range of dimensional measurement services to help you avoid these manufacturing errors and more. Starting with a capability study is an excellent way to save time and money and improve the efficiency of your manufacturing process. Contact us today to learn more or to discuss how we can work together.

Read More

Topics: manufacturing, dimensional measurement, quality

Four Reasons to Include Dimensional Inspection in Your Manufacturing

Posted by Mike Knicker on Oct 3, 2012 2:35:00 PM


Direct Computer Control Coordinate Measuring MachineA recent 
Frost & Sullivan report has indicated that more and more industries are cutting back on their internal dimensional inspection resources because of limited funds and a lack of skilled technicians.  The most viable solutions for many companies it to outsource this valuable service to third-party providers like Q-Plus Labs.

When it comes to dimensional inspection, the more accuracy you have, the better the outcome will be. In many cases, this means applying different measurement techniques for different applications. The same equipment and technology will not be used to measure both automobile parts, medical devices, and the sharpness of an instrument. By the same token, a diverse staff of trained professionals is required to provide dimensional inspection services across multiple categories.

Reasons to Include Dimensional Inspection in Manufacturing
Regardless of the industry or the type of dimensional inspection required, there are some universal reasons to include this valuable step in your manufacturing:
  1. Risk management - Testing products or components before they enter the manufacturing process helps you reduce overall risk and liability. You can identify and solve problems before they become costly, or even worse, disastrous. Whether you are testing the roundness of a precision bearing or the curvature of the interior thread root of a bolt, accurate measurements can mean the difference between failure and success.
     
  2. More effective decision making - Sometimes a process or product that looks good on paper does not seem like such a good idea when it becomes a reality. Advance measurements can help you make key decisions during the development process, before it's too late to make changes.
     
  3. Ability to determine process capability - If the end product requires high levels of pressure, force, shear, or any other extreme environment, validating a process or equipment with a capability study before it is subjected to these conditions can save your business a lot of time and money. In fact, any products that will be going into high-volume production should have a capability study as part of process control.
     
  4. Regulatory compliance - Depending on your industry, you may need to meet certain regulatory requirements. Validating these requirements before submitting to an audit is the best way to ensure that you are compliant.
     
Applications for Dimensional Inspection
The applications that can benefit from this type of measurement and testing are countless; these are just a few examples:
  • Wall thickness of bottles, pipes, castings, and formed sheet metal
  • Settling disputes between manufacturers and subcontractors
  • Video, laser, and light scanning for objects that are too small or soft for contact measurements
  • Nano measurements for surface finishes, extremely small parts, and high-precision instruments
  • Fully-automated CMM inspection to test manufactured parts for conformance to engineering drawing requirements

Q-Plus Labs has the equipment, technology, and knowledge to provide the dimensional inspection services you need for your products. Whether you need to analyze large contours, measure dimensions at the nano level, or perform a specialized non-contact inspection, we have the necessary resources to provide accurate, unbiased results in whatever format you require. 

Contact us or download one of our many product and services brochures to learn more about dimensional inspection and the many other services Q-Plus Labs offers.

How has dimensional inspection benefited your business in the past? 

Read More

Topics: manufacturing, dimensional inspection, measurements, regulatory compliance, risk management