Q-Plus Labs

Sitemap | Contact Us 

Dimensional Measurement Blog

Four Considerations for Selecting 3D Scanning Equipment

Posted by Mike Knicker on Aug 23, 2013 7:32:00 AM

3d scanning equipment considerations

3D scanning can be used for multiple reasons, including first article inspection, reverse engineering, and other types of measurement applications. The purpose of 3D scanning is to collect data points to create a digital representation of the object. These data points can be gathered using lasers, white light, contact sensors, and other methods depending on the characteristics of the object being measured.

Although the objective behind the technologies are similar (obtaining measurement data), not all 3D scanning equipment is the same. For example, some equipment gathers data by coming into contact with the object, while others use non-contact optical technology to collect measurements.

Four Factors for Selecting 3D Scanning Equipment

If you plan to purchase 3D scanning equipment, you want to be sure of your choice. Consider the following factors as you reach a decision about what to buy:
  1. Object characteristics - 3D scanning equipment can be used to collect measurement data for objects of almost all shapes and sizes. However, the type of equipment you select depends on the surface characteristics of the object, whether it has internal geometry, its size, and other factors.

  2. Speed - How fast do you need results? Some devices provide faster results than others; however, speed can also impact quality and accuracy, so look at the big picture when you consider what equipment to buy.

  3. Accuracy - This factor is extremely important in many industries. Do you need NIST traceability or an accuracy statement? Make sure that the equipment you buy can meet the accuracy requirements for your applications.

  4. Cost - The cost of 3D scanning equipment varies, even within the same type and class of technology. Although equipment price is an important consideration, it should not be the only one. If the equipment you buy can't produce the results you need, your money will have been wasted.
If you're not sure what to buy, work with a reseller and service provider that has extensive expertise in 3D scanning. The people who use this equipment every day will be able to tell you which systems make the most sense for your needs.

Purchasing 3D scanning equipment is not your only option; you can also work with a qualified lab to outsource measurement services. This can be a more cost-effective solution if you don't often need 3D scanning or will be measuring multiple types of objects.

Whether you decide to buy equipment or outsource services, Q-PLUS Labs is here to help. We are a certified reseller for multiple manufacturers, and we provide 3D scanning, reverse engineering, and dimensional inspection services to all types of industries. Request a quote today to get started.

Do you want to embrace this modern method of measuring but don't know where to start?

Read More

Topics: equipment purchasing, purchasing, reverse engineering equipment, equipment purchases, 3D Scanning, 3D scanning equipment

Outsourcing Reverse Engineering? Answer These 7 Questions

Posted by Mike Knicker on Jul 19, 2013 5:59:00 AM

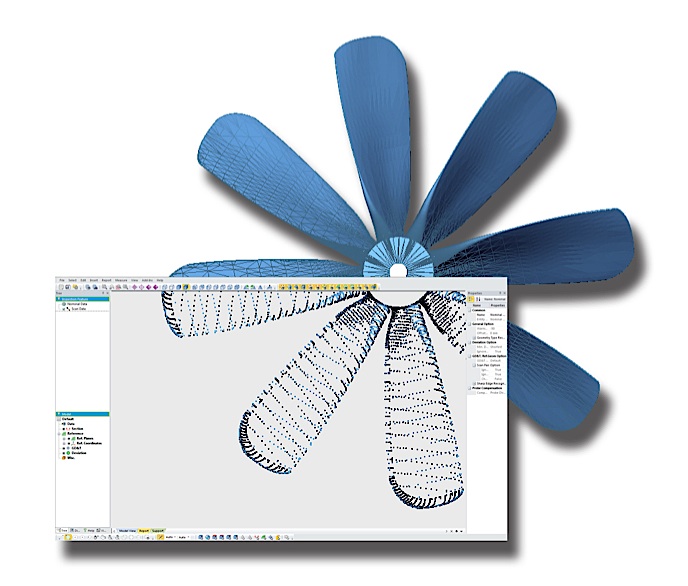
reverse engineering 3D fan

If you have decided that outsourcing reverse engineering services makes the most sense for your project or business, you still have some decisions to make. Not all reverse engineering applications are the same. You must decide what type of equipment to use and what kind of output you need, as well as consider a range of other factors.

This checklist is designed to help you get started.

7 Questions to Ask When Outsourcing Reverse Engineering

  1. What is the objective of reverse engineering? Your provider will need to know your end goals in order to help you make the most cost-effective decisions.

  2. What type of reverse engineering makes the most sense for your application? You can decide between design intent, verbatim (as-built), or a hybrid of the two. When reverse engineering for design intent, the measurements of the original object may be adjusted to correct for imperfections so that the final product will function in the desired way. The verbatim approach aims to create an exact replica of the original object, including imperfections, and the hybrid approach can be used in cases when the original object features multiple types of surfaces.

  3. How should you process measurement data? When gathering measurements to reverse engineer an object, you can use a dimension-driven approach, shrink-wrap surfaces, or a combination of the two.

  4. How accurate do you need to be? Depending on your objectives and the reasons for reverse engineering, your application might need a certain degree of measurement accuracy. For example, in the case of an object that must meet regulatory specifications, accuracy is extremely important. However, if you are replicating a statue for sale in a gift shop, some minor differences are acceptable. 

  5. Does the original object need to remain intact? In some cases, in order to get the most accurate measurements, the original object will need to be disassembled or even destroyed. If this is not an option for your application, your provider must know that at the beginning of the process.

  6. What type of equipment should you use? Many different types of measurement equipment can be used for reverse engineering. Your provider will consider the level of accuracy required, surface characteristics of the original object, and many other factors when deciding how best to take measurements.

  7. Do you need to measure the object in a constrained state? For some applications, measuring the object while in a state that simulates how it's shape will conform in assembly makes more sense. You might also need to measure other objects or parts if you are reverse engineering an item that is part of an assembly.

Your provider can (and should) help you answer many of these questions, so don't be afraid to ask.

One of the greatest advantages of outsourcing reverse engineering services to providers such as Q-PLUS Labs is that we operate across multiple industries. This means that we offer a broad range of equipment types and the expertise to handle almost any reverse engineering application. Contact us today to learn more or to get started on your next reverse engineering project.


Read More

Topics: dimensional measurement, dimensional inspection, reverse engineering, outsourcing, measurements, criteria, 3D scanners, metrology, 3D Scanning

Butter Dish 2.0: A Reverse Engineering Case Study

Posted by Mike Knicker on Jun 24, 2013 6:01:00 AM

 reverse engineering case study

When we talk about reverse engineering and dimensional measurement, we often refer to manufactured parts, engineering tolerances, and other abstract concepts. Although we don't often encounter this particular type of project, this case study provides an excellent example of reverse engineering in action.

Mike M. came to Q-PLUS with an uncommon request and an even more unique story behind it. 

Butter Dish Beginnings

In 1979, Mike's grandparents hosted a family gathering. All was going well until the smoke alarm went off! After much searching and a hint of panic, the source of the smoke was discovered: A plastic butter dish had fallen onto the dishwasher’s heating element, melted, and triggered the smoke alarm. 

The unlucky cousin who had loaded the dishwasher looked in and asked, "Is it ruined?" One look at the clearly ruined butter dish sparked hilarity and prompted her grandfather to mount it on a plaque and present it to her. The butter dish became a family award that was presented annually to the person who had done the dumbest thing the year before.

Some of the most memorable awards were given to:

  • The grandfather who tried to fix the bathroom plumbing without turning the water off first
  • The brother-in-law who mistakenly wore one new shoe and one old shoe on a trip to Europe
  • The niece who fell asleep on the New York City subway, missed her stop, and lost her companion in the process
  • The uncle who, in a middle-of-the-night indigestion attack, reached for a bottle of liquid antacid and took a swig of white glue instead

For more than 25 years, the not-so-coveted award was passed around the family. Eventually, the original award-winner decided that she wanted this special keepsake permanently back in her possession. What was the rest of the family to do?

Barriers to Butter Dish Duplication

Mike decided to explore the option of replicating the cherished (and deformed) butter dish to carry on the family tradition. He went to the R&D department at the medical device company where he works and asked if they could possibly make a copy using the in-house 3-D printer.

The initial response was, "A butter dish? Sure, we can copy that." But after one look at this butter dish in all its melted glory, the R&D team members decided that it was beyond their capabilities. It was too complicated because the shape was so irregular. However, they did recommend a lab that they sometimes used for outsourcing this type of work.

Mike contacted the recommended lab and thought he had found a solution ... until he sent a picture of the butter dish. Foiled again!

Q-PLUS to the Rescue

Still on a mission to continue this unique family tradition, Mike turned to the trusty Internet. He found the Q-PLUS website, filled out the contact form, and got a return phone call in 15 minutes. Unlike the R&D team and the first lab Mike tried, we were not only up for the challenge, but we also were excited about it. What a great story!

Unlike many of our other projects in which clients send in objects for reverse engineering, this was a special case. Mike was concerned that a melted butter dish received in the mail would not get the respect it deserved and could possibly get lost (or tossed) after all these years. We scheduled time on a Saturday for him to bring the award in and have it scanned.

For the scanner, we used a high-end white light scanner: a Steinbichler Comet 5 4M. There are less powerful scanners we could have used for a project like this, but our team got caught up in the excitement and wanted to produce the best possible results. The white light scanner was used because we needed a massive amount of highly accurate data to capture the detail of the melted butter dish. This device was also selected because it provides relatively fast results and budget was a consideration.

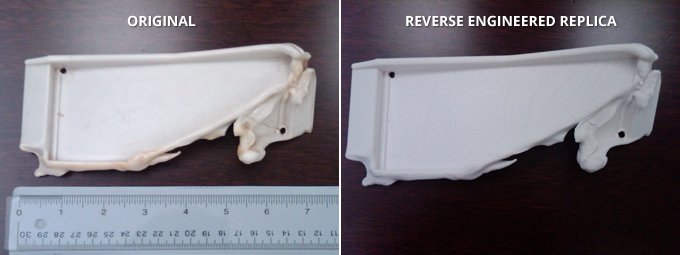
This particular project is a perfect example of “as-built” reverse engineering. The goal was to create a replica of the original object, errors and all (and clearly, this butter dish was rife with errors!). On the other hand, if we were reverse engineering for design intent, we would have tried to produce a functional butter dish that matched its pre-melted state.

Butter Dish 2.0 Is Back in Action
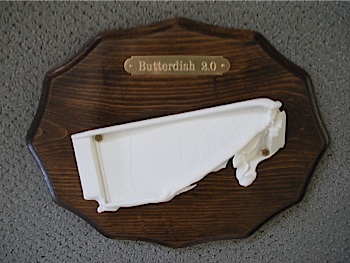
butter dish exampleMike was able to take our digital scan and have a replica made using a 3-D printer. Butter Dish 2.0 lives on, and the family tradition remains uninterrupted.

In addition to achieving the desired goal, Mike was happy to learn more about the scanning and printing process. He thought that it was amazing that an object, especially one so complicated, could be replicated so exactly.

When asked about his experience with Q-PLUS, Mike said:

“Q-PLUS was very responsive. Within 15 minutes, I received a return call. Throughout the process, they were very engaged and had good follow-through every step of the way. I know my request was unusual, but they were very accommodating and flexible with scheduling so I could bring the butter dish to the lab myself.”

Now that the butter dish replication problem is solved, Mike's biggest worry is that he will be the next award-winner!

View the Butter Dish Scan

Click to view scan in Internet Explorer

Click to view scan in Firefox, Safari, and Chrome


Read More

Topics: reverse engineering, 3D Scanning, case studies, 3d printing

Four Powerful Ways to Use Dimensional Inspection

Posted by Mike Knicker on May 22, 2013 5:00:00 AM

dimensional inspection powerful usesDimensional inspection is used in a broad range of industries for a wide variety of applications. However, there are some common reasons why this type of measurement is used. Whether the objective is to compare a prototype to a drawing or to ensure that a finished product meets certain standards, the fundamentals of dimensional inspection remain the same. Highly accurate measurements are taken to determine how closely an object matches its originally intended dimensions.
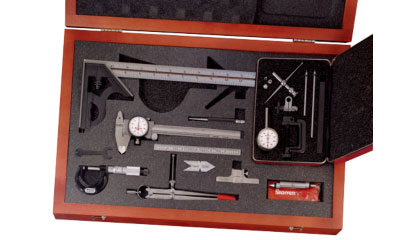
In general, if dimensional measurement is required, the results must be both accurate and precise. Although multiple techniques and countless applications exist, there are four main categories of dimensional inspection.

Four Common Dimensional Inspection Applications

  1. First article inspection. Implementing a manufacturing process requires extreme attention to detail, especially if the process is new or if the equipment has been specially designed. First article inspection is required to ensure that the equipment was properly installed and calibrated, and to verify the manufacturing process. Dimensional measurement is used to compare the first objects from the manufacturing line to 3-D CAD models or other specifications.
  2. Quality control. When objects coming off a manufacturing line must meet certain quality standards, measurement equipment is used to confirm that the dimensions fall within the required tolerance levels. In some cases, when the tolerance levels are more rigorous, each object is measured automatically. In other cases, batches might be spot-checked for quality.
  3. Regulatory compliance. In industries for which regulatory compliance is necessary, dimensional measurement ensures that the required specifications are met. Regulatory bodies such as the FDA or FAA often have requirements regarding the dimensions of certain components. 
  4. High-precision engineering. When creating a larger assembly from smaller parts, high precision is often required. If a minor flaw or inconsistency can impact an entire process, ensuring that such imperfections do not exist is critical. 

Employing dimensional measurement in these scenarios offers many benefits, including reduced liability, improved quality, and lower costs.

If you need dimensional inspection services for your business, contact the professionals at Q-PLUS Labs. We provide outsourced measurement services for a range of industries including manufacturing, aerospace, medical, and more. Schedule a consultation today to learn more about how we can help you with your dimensional measurement needs.

How does your company use dimensional inspection?


Read More

Topics: dimensional measurement, dimensional inspection, 3D Scanning, inspection, dimensional inspection equipment

10 Types of Dimensional Inspection Hand Tools and When to Use Them

Posted by Mike Knicker on Apr 30, 2013 5:55:00 AM

dimensional inspection hand toolsThe simplest solution is often the best. This old adage applies to almost anything, including dimensional inspection. In a room full of high-tech equipment like 3D scanners, coordinating measuring machines, and high-precision devices that can measure on a nano scale, sometimes the only thing really you need is a pair of calipers.

Dimensional inspection
hand tools are sometimes the best answer when you need to take measurements. They are both portable and precise, are generally cost-effective, and they can be used for a broad range of applications.

10 Types of Dimensional Inspection Hand Tools 

  1. Calipers - There are several different types of calipers designed to measure length, depth, internal, and external dimensions. Calipers can also be used to transfer dimensions from one object to another.
  2. Bore gages - Take an internal diameter measurement or compare to a pre-determined standard.
  3. Fixed gages - Used only to compare an object to a standard, fixed gages can measure attributes such as angle, length, radius, bore size, thickness, and other parameters.
  4. Micrometers - These dimensional inspection hand tools can use mechanical, digital, laser, dial, or scale technology to precisely measure length, depth, thickness, diameter, height, roundness, or bore.
  5. Protractors - Measure angles with a variable protractor or compare the angle of an object to a standard with an angle gage.
  6. Indicators and comparators - The precision movement of a spindle or probe is amplified so the results can be displayed digitally or on a dial or column.
  7. Air metrology instruments - Thickness, depth, diameter, roundness, taper, and bore can be measured by calculating changes in pressure or air flow.
  8. Ring gages - Typically used as a pass/fail test, ring gages can be threaded, smooth, or tapered to test the size of pins, threaded studs, and shafts.
  9. Length gages - Electronic or mechanical, these devices are used to measure or compare the length of an object.
  10. Thread gages - The spacing, shape, size, and geometry of a thread can be verified or measured with a thread gage.

Although dimensional inspection hand tools are frequently a simple and elegant solution, they still must be treated with the same care as a machine that uses more advanced technology. Some devices must be calibrated or regularly cleaned to ensure that they provide consistent, accurate results. It is also important that the operator is appropriately trained to prevent human error.

Whether you have a simple measuring problem or a complex quality control requirement, come to Q-PLUS Labs for all of your dimensional inspection needs. We'll help you select the right equipment and either train your staff to use it or perform the measurements in-house. Want to learn more about selecting the right dimensional inspection equipment for your application? Download our free e-book today.

Which dimensional inspection hand tools have you used?


Read More

Topics: dimensional inspection, 3D scanners, metrology, 3D Scanning, hand tools

Top 3 Scenarios NOT to Use 3D Scanning

Posted by Mike Knicker on Mar 5, 2013 8:59:00 AM

dimensional measurement3D scanning can be used for a broad range of applications. For example, you might want to create a replica of an artifact or inspect a sand casting to a 3D CAD model. However, not all dimensional measurement applications warrant the use of 3D scanning. In some cases, a different or simpler approach might be appropriate.
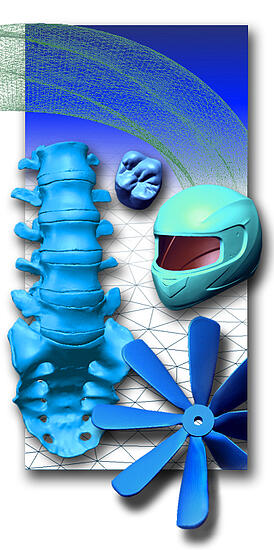
So how do you know when not to use 3D scanning? If any of these three applications are similar to yours, you might want to re-evaluate your approach:
  1. You only need to measure one dimension - The whole point of using 3D scanners is to measure objects in three dimensions. If you only need to know the length or width of an object, a simpler (and less expensive) measurement system or gage may suffice.
  2. You need an extraordinarily high level of precision - certain high-end 3D scanners have the ability to produce very precise results, but some applications call for an immensely high degree of accuracy and precision. If you are measuring the profile of a ground cam or a high-speed gear, a non-contact 3D scanner will not likely be a viable solution.
  3. Your object has interior surfaces that cannot be seen - If you can't see a given surface, an optical 3D scanner can't see it either. In these cases, a contact probe can often reach the geometry of interest such as a bore hole or other interior surfaces. In other cases, however, sectioning or slicing of the object may be required. CT scanning is also a possible solution however this method has several limitations of its own.
Fortunately, 3D scanners are just one of many tools in the dimensional measurement toolbox. Other types of measuring devices you can use include:
  • Direct computer control coordinate measuring machine (DCC-CMM)
  • Optical video probes and comparators
  • Contour and form testers
  • Reverse Rapid Prototyping system (CGI)

This short list represents just a few of the options that might be useful for your dimensional measurement applications. The best way to determine what type of equipment best matches your needs is to work with a qualified dimensional measurement service provider that has the experience and expertise to help you decide.

Q-PLUS Labs provides 3D scanning and a range of other dimensional measurement and inspection services, so no matter what measurement problem you are trying to solve, we can help. Contact us today to schedule a consultation.

What projects are you considering for 3D scanning? Might another measurement method provide the results you need?

Read More

Topics: dimensional measurement, dimensional inspection, reverse engineering, 3D Scanning

Top Six Situations When You Would Use 3D Scanning

Posted by Mike Knicker on Jan 29, 2013 6:08:00 AM

3d laser scanning3D scanning can be used for a broad range of applications, some of which you might not expect. It can be employed in any situation where the size, shape, and surface characteristics of an object are important. Advances in the technology have further broadened the scope of its utility. It is possible to measure geometry with greater accuracy as well as to capture small details that were previously not possible to measure.

The purpose of 3D scanning is to capture surface geometry, but the reasons you might want to do this can vary significantly. Some of the most common applications include:
  1. Reverse engineering and protoyping - There are many reasons that one might want to replicate an object through reverse engineering, and 3D scanning is one of the most effective ways to create an accurate representation of the original object. The level of accuracy required can also vary depending on the application, so it is important to understand the objectives for reverse engineering.
  2. Manufacturing quality control - In many cases, parts coming off a manufacturing line must meet specifications within a certain tolerance range. 3D scanning can be used to accept or reject products for quality control, and to ensure that mass-produced parts are able to fit together properly and consistently.
  3. Industrial metrology - A highly detailed 3D representation of a machine part can be used to evaluate wear patterns, confirm the final build, and analyze other complex surfaces. It can also be used to replace old parts that do not have an existing CAD model.
  4. Medical applications - Teeth, bones, and even skin surfaces can be modeled using 3D scanner equipment. This information can be used to create prosthetics, orthotics, and other medical devices.
  5. Movie production - The entertainment industry uses 3D scans for visual effects and other 3D graphics. This technology is also commonly used for video games and animation. View our 3D scanning gallery to see how 3D renderings of people and other objects can be generated.
  6. Artifact documentation - Archaeologists and other scientists can use 3D imaging to create replicas of unique artifacts and other materials of interest without damaging them. The scans can also be used for modeling, documentation, and restoration.

The type of 3D scanning equipment you select depends on the application and a number of other factors. Choosing the right equipment early in the process can help you save money and produce the best possible results. Q-PLUS Labs is here to help you select the right equipment, or you can outsource some or all of your 3D scanning needs directly to us. Contact us today to learn more or to schedule a consultation.

What 3D scanning applications have you used in your business?


Read More

Topics: dimensional measurement, dimensional inspection, reverse engineering, 3D Scanning

Five Misconceptions About 3D Scanning Tools

Posted by Mike Knicker on Jan 8, 2013 8:35:00 AM

3d scanning3D scanners are increasingly used for dimensional inspection and reverse engineering. Much like other measurement tools, these devices do not offer a one-size-fits-all solution. In fact, selecting the right 3D scanner is a rigorous process that depends on a number of factors.

Understanding these five common misconceptions about 3D scanners is a good first step toward selecting the right one:
  1. All 3D scanning equipment uses the same technology - While virtually all 3D scanners are designed to collect data about the shape of an object, the methods for data collection and measurement are not all the same. Some 3D scanners use contact probes, while others use non-contact measurement methods such as structured white light or lasers to measure surface characteristics.

  2. All 3D scanners can be used on any object - A shiny or transparent object will require a different 3D scanning device than an opaque one with a matte surface. Similarly, elastic or delicate materials cannot be measured with contact devices because they may become altered or damaged during the measurement process. The characteristics of the object will help define which 3D scanning equipment should be used.

  3. All 3D scanners provide the same level of accuracy - 3D scanners use multiple data points to model the dimensions of an object. The more data points, the more accurate the result can be. The accuracy of a 3D scanner depends on the type of technology used, the quality of the cameras, the level of calibration, and several other factors; not all 3D scanning equipment provides the same level of accuracy.

  4. All 3D scanners cost the same - Because 3D scanners use different types of technology and provide various levels of precision, equipment costs can vary substantially. This is one of the reasons it's so important to select the right equipment for your specific needs.

  5. 3D scanners can only be used in a very limited number of applications - Some of the better known uses of 3D scanners include reverse engineering, manufacturing quality control, and prototype development, but the potential applications are unlimited. For example, the entertainment industry frequently uses 3D scanning in the development of video games; archaeologists use it to replicate artifacts; marketers use it for promotional videos; and the medical industry uses it to create prosthetic limbs and other medical devices.

Q-PLUS Labs provides 3D scanning and other metrology services. We are also a reseller of a wide array of dimensional measurement devices and systems from top manufacturers, serving a broad range of applications. If you need 3D scanning solutions, we can help you select the best tools for your applications, or provide the scanning services for you. Contact us today to learn more about the products and services we offer.

What applications have you used 3D scanning tools for?

Read More

Topics: dimensional measurement, 3D Scanning