Q-Plus Labs

Sitemap | Contact Us 

Dimensional Measurement Blog

Nano measurements: Contact-based vs optical-based, which should you choose?

Posted by Mike Knicker on Jul 13, 2016 2:36:31 PM

Nano-measurements-Contact-based_vs_optical-based_which_should_you_choose.jpg

With advances in the manufacturing of smaller and smaller components, there is a need for measurements at that scale to ensure that best accuracy is maintained. If you require measurement at the nano scale, or one billionth of a meter, then choosing the right technology will be high on your priority list. You want to make the most informed decision when choosing the equipment for measurements that are this important.

In general, there are two different types of nano-measurement technology, contact-based and optical-based. Here is a bit about each type of nano-measurement technology to help you determine which measurement option is the best fit for your application:

How do contact-based nano-measurements work?
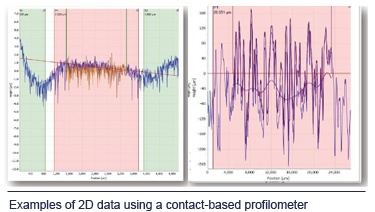
1_2D_Image2.jpgAs the name suggests, this type of nano measurement solution will come in contact with the piece to be measured in order to determine its dimensions. The two main types of equipment capable of these measurements are stylus profilometers and the atomic force microscope. Both have been in use for some time and use extremely sensitive styluses to collect the measurement data required.

This type of nano-measurement is ideal if you need to measure a surface with a high aspect ratio since this can be a difficult to accomplish with optical-based solutions. These solutions have been around for a while so they are a tried and true way of measuring, and these methods are practically good at delivering 2-D data.

How do optical-based nano-measurements work?
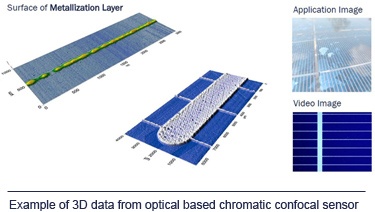
1_3D_Image2.jpgOptical-based nano-measurement technologies are quickly becoming the go-to devices for measurements at the nano level. Since these techniques do not touch the surface of the piece to be measured, there is no risk that small or delicate parts will be damaged or moved during measurement. As an added feature, optical measurements are also done more quickly than traditional contact-based measurements, and typically have an innate ability to obtain 3D measurements in addition to 2D data.

There are several methods used in optical-based nano-measurement; among them are triangulation, white light interferometry, confocal microscopes and chromatic confocal sensors. The commonality of these methods is the use of light that is emitted and then re-captured in a manner that will allow the equipment to make the extremely accurate measurements necessary to measure at the nano level.

Which type of nano-measurement is right for you?

Each of the methods listed above has benefits and drawbacks that you will need to weigh in your decision; and the decision greatly depends on what you will be measuring. As stated, contact-based measurements can make very high resolution measurements because they come in contact with the surface, but this also risks damage for delicate parts and can be much more expensive to operate.

By contrast, optical-based measurements do not risk damage to parts as only light comes in contact with the pieces, and are capable of measuring much more quickly that the contact-based methods. The drawback can be some difficulty with surfaces with high aspect ratios; such as surfaces with many features such as grooves, sharp edges, holes, steps, steep slopes or channels. So it is important to know what you will be measuring when you are choosing between the nano-measurement equipment available.

This is where the dedicated team at Q-PLUS Labs can help. Our experts have taken the time to know all the aspects of each piece of equipment best suited for each customer's application in order to recommend the best fit measurement equipment. Whether you need measurement services or help finding the right equipment for in-house measurements, our team can help. Contact us today to schedule a consultation.

New Call-to-action


Read More

Topics: dimensional measurement, 3D Scanning, nano measurement,, nanoscale,, dimensional measurement services, noncontact inspection, measurement equipment, nanometer

Top 7 Applications that Benefit from Nano Measurement

Posted by Mike Knicker on Apr 14, 2015 12:45:00 PM

Top 7 Applications that Benefit from Nano Measurement

The development of new ways to measure objects and surfaces at the nano scale has allowed dimensional inspection providers to improve both accuracy and speed. It has also enabled the measurement of larger samples and objects with different surface types, as well as provide better 3D imaging capability.

Advances in nano measurement are interesting from a scientific perspective, but they also offer practical benefits in a number of different areas.

7 Applications that Benefit from Nano Measurement

Some of the applications that can benefit from better nano measurement include:

  1. Dental - Orthodontic brackets with very small features are difficult to accurately measure with contact probes and vision systems. The use of chromatic confocal technology enables better data collection because stylus size is not an issue, it measures in 3D without contacting the part, and the results are not impacted by reflectivity or translucence.
  2. Forensics - The ability to measure fibers and tool marks with greater accuracy gives forensics professionals better resources when processing evidence. Even specimens without parametric geometry (such as tissue samples) can be modeled in 3D.
  3. Microelectronics - Circuit boards at the micro and nano scale must be measured for quality control to ensure that the conducting path is consistent with specifications and that the wire bonds are correctly oriented. Because the samples are so sensitive, they must not be destroyed during the measurement process, which is why a non-contact system is the best solution.
  4. Medical - Artificial joints, implants, and other medical devices require highly accurate surface geometry to perform at their best. Measuring surface form and roughness at the nano scale ensures that the specifications are met. Nano measurement can also be used in the development and manufacturing of surgical instruments.
  5. Printing - Nano measurement is used to determine the surface roughness of different types of paper. It can also be employed to analyze printing results and detect errors.
  6. Tools and machining - Micro tools and components require a high level of accuracy to operate correctly. Nano measurement can be used for detecting tiny flaws in a micro gear, for measuring form, or for determining the amount of wear on a part.
  7. Material science - The ability to accurately measure a broad range of surface types at the nano scale, without risk of damaging the sample, is a valuable addition to the material science industry. Even materials with differing reflective properties can be measured with the same device.

The list of potential applications goes on and on. Automobiles, injection molding, and plastic films are just a few more examples of the types of industries, processes, and products that can benefit from new nano measurement technologies.

Q-PLUS can help you with your nano measurement needs. We regularly work with businesses in almost every type of industry, so no matter what your application is, we have the experience and expertise you need to get accurate results. Contact us today to schedule your free consultation.

New Call-to-action

Read More

Topics: dimensional measurement, dimensional inspection, nano measurement,, nano scanning,, nanoscale,, surface finish analysis,

Three Types of 3D Scanning Methods for Non-Contact Nano Measurement

Posted by Mike Knicker on Feb 18, 2015 2:50:00 PM

Three Types of 3D Scanning Methods for Non-Contact Nano Measurement

Dimensional inspection includes many types of scanning devices for a broad range of applications. In the realm of 3D Scanning, the level of detail that can be captured makes it the method of choice, especially for measuring very small objects requiring non-contact measurement methods.

Whereas contact 3D scanners collect measurement data by physically scanning the object with a device that comes into contact with every point on the surface, non-contact 3D Scanners collect immense amounts of data quickly without altering the geometry of the object. This is also an advantage for collecting measurements on the nano scale.

3 Types of Non-Contact 3D Scanning Methods

Laser-Scanning Confocal Microscopes
A confocal microscope uses a process called optical sectioning to collect images from various depths. These images can be reconstructed with a computer to create a 3D model of complex small objects. Unlike other laser systems, a confocal microscope only sees one depth level at a time, which allows it to generate a highly controlled depth of focus for very small objects with tight tolerances.

White Light Interferometry
This non-contact measurement system allows you to obtain surface measurements at the nanometer level. The technology behind white light interferometry uses wave superposition to measure distances based on data collected about reflected wave interactions. Interferometers can also be combined with microscopes to measure very small objects. Because they rely on the detection of waves and not optical images, interferometers are also useful for measuring objects with reflective surfaces.

Chromatic Confocal
Like interferometry, chromatic confocal also uses white light to collect measurement data. However, whereas interferometry uses the superposition of waves after they are reflected off the object, chromatic confocal measures the wavelength as it hits the surface of the object. This method produces more reliable results when measuring surface roughness or step-height depth, due to the minimum mathematical calculation required. The tolerances of large objects may allow the use of a thin whitening spray to facilitate scanning but the geometry of very small objects could be potentially buried by it. Fortunately, all of these methods work well with various types of surfaces from reflective to absorbent.

If you require any of these types of 3D Scanning methods, or if you're not sure what you need, the experts at Q-PLUS Labs are here to help. We'll work closely with you through every step of the process to ensure that you get the best results for your application. Contact us anytime if you have questions, or if you're ready to get started, call us today.


dimensional measurement assessment


Read More

Topics: dimensional measurement, 3D scanners, 3D Scanning, CMMs, articulating arms, 3D scanning equipment, case studies, engine, Faro Arm, Faro, SAE, race car, Fullerton SAE

Q-PLUS Labs' Case Study: California State University, Fullerton SAE Race Car Engine Dimensional Analysis

Posted by Mike Knicker on Jan 27, 2015 10:55:00 AM

Q-PLUS Labs Case Study: Race Car Engine

California State University, Fullerton's Society of Automotive Engineers (SAE) chapter chose Q-PLUS Labs to aid them with the challenge to compete in the Formula SAE, a competition which encompasses designing, building, and competing a mini-formula style race car that will be evaluated for its potential as a production item.

Introduction

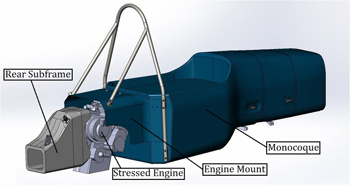
chassisFullerton's SAE uses a Yamaha R6 Motorcycle engine, a large displacement choice for the 610cc class. The car's design utilizes the R6 engine as a stressed member to connect the drivetrain to the cockpit. This type of engine design requires the chassis to work with the engine as an active structural element of the chassis to transmit forces and torques, rather than using standard anti-vibration mounts to passively contain it. The R6 engine was chosen based off its high power output and ability to be used as a stressed member. In conjunction with suspension design and tire selection, the engine weight works well to keel the tires while heated under the track's conditions.
Our Process

engine

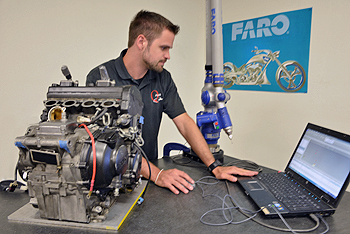
Because the race car's design is based on the integrity and precision accuracy of the engine's measurements, Fullerton's SAE sought the expertise of Q-PLUS Labs' dimensional inspection engineers. Using a Faro Arm CMM, Q-PLUS Labs provided a dimensional analysis of each mounting point for the engine. These points are integral not only to the race car's design but also to the safety of the driver.

Given the engine's exact 3D measurements, Fullerton's SAE could confidently proceed with their design. They were able to retrofit and reverse engineer the chassis to properly fit onto the race car's engine. Currently in the manufacturing stage process, in a few months they will produce the assembled chassis to compete in the Formula SAE® Lincoln this June.


dimensional measurement assessment


Read More

Topics: dimensional measurement, 3D scanners, 3D Scanning, CMMs, articulating arms, 3D scanning equipment, case studies, engine, Faro Arm, Faro, SAE, race car, Fullerton SAE

10 Industries that Use Dimensional Measurement Technology

Posted by Mike Knicker on Sep 2, 2014 10:00:00 AM

05-Industries-that-Use-Dimensional-Measurement-Technology

Dimensional measurement technology may not be a common topic of conversation for the general public, but it is an essential component of many products that we use every day. It is one of the several behind-the-scenes steps in many manufacturing processes and is also often used during product development.

Some ways that dimensional measurement technology can be used include:

  • First article inspection - the process of verifying that the initial objects produced on a manufacturing line meet the required specifications
  • Reverse engineering - the process of creating a digital replica of an existing object for the purpose of reproduction
  • Quality control - verifying that an object's measurements meet the required specifications

Regardless of the reason for dimensional measurement, it is an indispensable process for many industries.

10 Industries that Rely on Dimensional Measurement Technology

Some of the industries that use dimensional measurement technology include:

  1. Medical - Applications such as prosthetic limbs and implanted medical devices require accurate measurements to ensure the best fit and proper operation.
     
  2. Jewelry - Dimensional measurement can be used for replicating an antique ring or creating a precise template for laser cutting earrings.
     
  3. Sporting goods - Your carbon fiber golf clubs have a very specific shape that requires dimensional measurement to ensure that the right contours are created during the manufacturing process.
     
  4. Dental - Dentists use dimensional measurement to replace lost or broken teeth with implants that exactly match the original.
     
  5. Automotive - Dimensional measurement is used throughout the automotive industry to create components that meet industry certification standards.
     
  6. Aerospace - Much like the automotive industry, aircraft parts must meet rigorous dimensional specifications.
     
  7. Entertainment - Dimensional measurement is employed to create lifelike masks and costumes for special effects, and for realistic digital renderings of people and objects for use in movies and video games.
     
  8. Construction - Engineers calculate the strength of certain structures based on their dimensions and shapes. Dimensional measurement is used to ensure that the parts used for construction match the specifications provided by engineers.
     
  9. Precision manufacturing - Dimensional measurement can be used in the manufacture of parts such as mirrors and lenses for telescopes that require a high level of accuracy at the sub-micron level.
     
  10. Telecommunications - As telecommunications systems become more and more sophisticated, precision-engineered parts are essential. Dimensional inspection ensures that manufactured parts are produced without flaws.

Q-PLUS Labs serves all of these industries and more. We provide first article inspection, reverse engineering, and consulting services to help you set up the right measurement process in-house. In addition to our dimensional measurement services, we also sell several brands of measurement equipment if you decide that you want your own team to perform on-site measurements. Contact us today to schedule your free consultation or to learn more about the services we offer.

Do you use dimensional measurement technology in your industry?

New Call-to-action

Read More

Topics: dimensional measurement

From Submarines to Surgical Equipment: 5 Surprising Applications for Dimensional Measurement Equipment

Posted by Mike Knicker on Aug 5, 2014 10:00:00 AM

5_Surprising_Applications_for_Dimension_Measurement_Equipment

Dimensional measurement equipment can be used for almost any application you can think of. Although the technology behind the equipment and the measurement methods are universal, the ways you can employ dimensional inspection are countless. It is used in industries as wide-ranging as aerospace, manufacturing, art restoration, and healthcare.

Whether it is used for the government, for the private sector, or even for personal projects, dimensional measurement equipment is a powerful tool. Manufacturers rely on it to verify the dimensions of parts of all shapes and sizes; restoration experts use it to re-create missing or damaged parts; and aerospace engineers use it to get to the moon and beyond.

5 Surprising Applications of Dimensional Measurement Equipment

Some of the applications for dimensional inspection equipment are quite serious, with major implications if the job is not done right. On the other hand, dimensional measurement equipment can also be used for more than just industrial applications.

Some of the more interesting ways metrology equipment is used include:

  1. Sports equipment - Getting just the right contours and angles on a golf club head and making a racing helmet as aerodynamic as possible are just a couple examples of the many ways dimensional measurement has been used for athletic products.
     
  2. Medical devices and healthcare - Dimensional measurement can be used to re-create the detailed shape of a lost tooth, create prosthetics that fit perfectly, and verify the dimensions of drug delivery devices such as inhalers and syringes.
     
  3. The entertainment industry - Creating lifelike masks or replicas of objects for props are just two ways that 3-D scanning equipment is used in the entertainment industry. Another example is the use of scanning technology to create realistic objects and people in video games.
     
  4. Art and archaeology - Relics and artifacts can be reverse engineered and replicated for future study without requiring the use of the original object.
     
  5. Personal enjoyment - Our Butter Dish 2.0 Case Study demonstrates the use of dimensional inspection for a less serious application. What was once a fun family award is now forever memorialized in an exact replica of the ill-fated butter dish.

If you need dimensional measurement equipment or want to outsource inspection services to a certified lab, get in touch with Q-PLUS Labs. We are qualified resellers of new, pre-owned, and custom equipment. Because we use the same equipment ourselves, we are uniquely qualified to help you select the solutions that will best meet your needs. Contact us today to learn more.

Do you have an application (surprising or not) that requires dimensional measurement equipment?

New Call-to-action

Read More

Topics: dimensional measurement

What to Look for in a Dimensional Measurement Facility

Posted by Mike Knicker on Jul 29, 2014 10:00:00 AM

What_to_Look_for_in_a_Dimensional_Measurement_Facility

Hiring a dimensional measurement provider can be a daunting task, especially if you are not well versed in the various techniques that are employed in the industry. What type of measurement techniques should be used for your application? What tolerances are acceptable? What is a reasonable turnaround time for your project?

All of these questions and more can be answered by a qualified provider that offers excellent service.

What to Look for in a Dimensional Inspection Lab

Everybody has different dimensional inspection priorities. Whether you are on a tight budget, face a quick deadline, or have a particularly challenging application, working with a provider that can reliably meet your needs is important.

  • Modern equipment - Although the field of dimensional measurement has existed since the first standardized measuring tools were created, the technology is constantly evolving. A facility that doesn't stay on the cutting edge of 3D scanning technology and all the other measurement methods may not be able to provide the most efficient and accurate service. Look for a lab that regularly updates its equipment inventory so that you can get the best service now and in the future.
     
  • ISO 17025 accreditation - An ISO 17025-accredited lab must meet certain quality standards so that you can be confident that your project will get the attention it deserves. ISO 17025 accreditation meets and exceeds the requirements of ISO 9001. Although many dimensional measurement facilities achieve ISO 9001 registration, not as many make the extra effort for ISO 17025 accreditation.
     
  • Prompt service - Some dimensional measurement services can't happen overnight, but you should be able to communicate with your provider as often as necessary. Look for a lab that responds quickly to your inquiries and has the flexibility and capacity to provide rush services if you need them.
     
  • Qualified employees - Dimensional measurement requires both training and experience. Make sure your provider is staffed with technicians who have the level of expertise required for your application. You should also look for a lab that offers the flexibility of on-site measurement and training so you can get the services you need, where you need them.

Founded by a seasoned dimensional measurement professional, Q-PLUS Labs has been in business for almost 30 years. We provide dimensional measurement services to a broad range of industries, including those that must meet the most rigorous standards. Contact us to learn more about the services we offer, or schedule your free consultation today.

What is most important to you when selecting a dimensional measurement facility?


dimensional measurement assessment

Read More

Topics: dimensional measurement

5 Predictions for the Future of Dimensional Inspection

Posted by Mike Knicker on Dec 1, 2013 10:38:42 AM

dimensional-inspection-predictions-resized

Although the principles and science of metrology have not changed, the world of dimensional inspection is always evolving. Advances in technology and a changing political landscape will influence the direction of the industry and play a role in the technology available to manufacturers. Preparing for these changes can help ensure that manufacturers can be confident that metrology labs provide the best service possible.

5 Predictions for the Future of Dimensional Inspection

1. There will be an increase in the use of 3D scanning.
Of all the technologies used in dimensional inspection, 3D scanning is one of the least mature despite how long it has existed. However, it is a proven technology that is rapidly becoming more widely known and accepted. Although 3D scanning is not likely to make other technologies obsolete, it is quickly becoming an essential tool for manufacturers that need dimensional inspection.

2. The United States will need more dimensional inspection capability.
Globalization has changed the manufacturing industry in the United States, but the pendulum is swinging back. According to the
Bureau of Labor Statistics, U.S. employment in the manufacturing sector has been steadily on the rise since 2010. Several factors contribute to the shift that is starting to occur:

  • Labor rates are increasing in China, bringing manufacturing back to the U.S.
  • Quality concerns are driving manufacturers to desire more control over manufacturing processes and quality.
  • Shipping times influence where a product is manufactured.
  • Strides in automation have made manufacturing in the U.S. more affordable.
  • The U.S. economy is gradually improving. 

3. More engineers will be required to provide these services.
The trend toward bringing manufacturing back to the United States means more metrology services will be required, which means that more engineers will be needed to perform these services. This increase in demand translates into more metrology courses at universities and better technical facilities for students. The end result for manufacturers is a larger pool of talent with better dimensional inspection skills.

4. Accuracy requirements will become increasingly more stringent.
As technology evolves, regulatory and quality requirements have become more and more stringent. This trend is only expected to continue, which means working with a provider that can meet increasingly high standards will be more important than ever for manufacturers.

5. New technology will continue to be introduced to the industry.
New technologies from the private sector will continue to be adapted and adopted by dimensional inspection departments and providers. These technologies are expected to be better, faster, and more cost-effective. Some of this technology will be bold and game-changing. 

What does all of this mean for people performing dimensional inspection? We must be prepared to adapt to the changing landscape by being open to new technologies, by supporting the educational institutions that will produce the next generation of engineers, and by ensuring that we have the capacity to respond to the increasing demand and complexity in the industry.

What do these predictions mean for manufacturers? You want a lab that has their finger on the pulse of the industry. Talk to your metrology provider about their approach to new technologies and the changing landscape of dimensional inspection. No matter what happens to the industry in the future, Q-PLUS Labs is committed to staying on the cutting edge of dimensional inspection. If you are interested in learning more about how our breadth and depth of experience can fill your metrology needs, request a quote today.  What are your own predictions for the future of dimensional inspection?

dimensional measurement assessment

Read More

Topics: dimensional measurement, dimensional inspection

Outsourcing Reverse Engineering? Answer These 7 Questions

Posted by Mike Knicker on Jul 19, 2013 5:59:00 AM

reverse engineering 3D fan

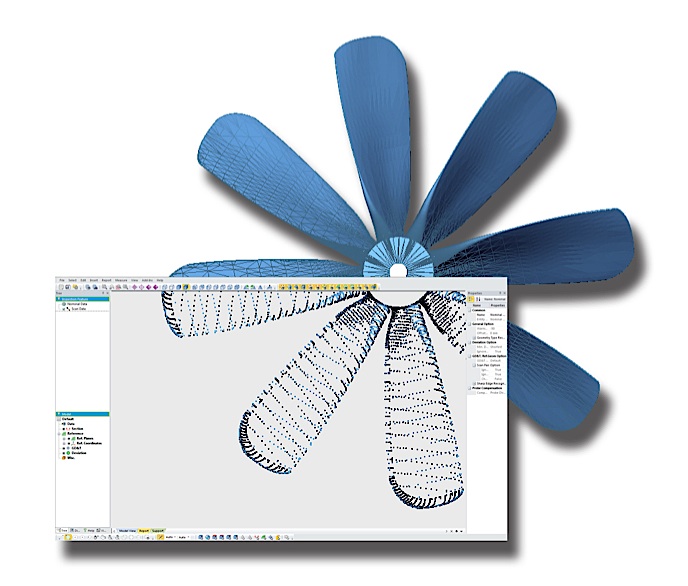
If you have decided that outsourcing reverse engineering services makes the most sense for your project or business, you still have some decisions to make. Not all reverse engineering applications are the same. You must decide what type of equipment to use and what kind of output you need, as well as consider a range of other factors.

This checklist is designed to help you get started.

7 Questions to Ask When Outsourcing Reverse Engineering

  1. What is the objective of reverse engineering? Your provider will need to know your end goals in order to help you make the most cost-effective decisions.

  2. What type of reverse engineering makes the most sense for your application? You can decide between design intent, verbatim (as-built), or a hybrid of the two. When reverse engineering for design intent, the measurements of the original object may be adjusted to correct for imperfections so that the final product will function in the desired way. The verbatim approach aims to create an exact replica of the original object, including imperfections, and the hybrid approach can be used in cases when the original object features multiple types of surfaces.

  3. How should you process measurement data? When gathering measurements to reverse engineer an object, you can use a dimension-driven approach, shrink-wrap surfaces, or a combination of the two.

  4. How accurate do you need to be? Depending on your objectives and the reasons for reverse engineering, your application might need a certain degree of measurement accuracy. For example, in the case of an object that must meet regulatory specifications, accuracy is extremely important. However, if you are replicating a statue for sale in a gift shop, some minor differences are acceptable. 

  5. Does the original object need to remain intact? In some cases, in order to get the most accurate measurements, the original object will need to be disassembled or even destroyed. If this is not an option for your application, your provider must know that at the beginning of the process.

  6. What type of equipment should you use? Many different types of measurement equipment can be used for reverse engineering. Your provider will consider the level of accuracy required, surface characteristics of the original object, and many other factors when deciding how best to take measurements.

  7. Do you need to measure the object in a constrained state? For some applications, measuring the object while in a state that simulates how it's shape will conform in assembly makes more sense. You might also need to measure other objects or parts if you are reverse engineering an item that is part of an assembly.

Your provider can (and should) help you answer many of these questions, so don't be afraid to ask.

One of the greatest advantages of outsourcing reverse engineering services to providers such as Q-PLUS Labs is that we operate across multiple industries. This means that we offer a broad range of equipment types and the expertise to handle almost any reverse engineering application. Contact us today to learn more or to get started on your next reverse engineering project.


Read More

Topics: dimensional measurement, dimensional inspection, reverse engineering, outsourcing, measurements, criteria, 3D scanners, metrology, 3D Scanning

Four Reasons Why Engineers Benefit from Learning More About Metrology

Posted by Mike Knicker on Jun 11, 2013 12:55:00 PM

learning metrologyIn order to obtain an engineering degree, you must learn certain concepts and skills in school. However, developing an engineering career means your education continues on the job. One field not typically taught extensively in engineering school is metrology, but for any engineer entering the field of manufacturing, understanding metrology is essential. 

In the simplest terms, metrology is the science of measurement. In practical terms, when it comes to manufacturing, engineers have a vested interest in knowing the fundamentals of geometric dimensioning and tolerancing, commonly referred to as GD&T. Engineering drawings and 3D CAD models use GD&T to communicate engineering dimensions and tolerances to manufacturing and quality staff. If the engineer doesn't know how to effectively communicate in the language of GD&T, the finished product will likely not meet the desired outcome.

Why Understanding Metrology Is Important

The purpose of engineering design is to convey information in a way that makes it as easy as possible for the manufacturing team to create the desired parts and assemblies. A good engineering drawing will consider:
  • The design intent
  • The people and processes involved in manufacturing
  • The inspection and verification process

The consequences of not understanding the fundamentals of GD&T can be dire:

  • Disruption of manufacturing schedules
  • Damaged reputations because of the inability to fulfill requirements
  • Inability to meet budgets

Because metrology is so important in the manufacturing industry, there are several benefits for young engineers to learn it sooner rather than later:

  1. Quality - Good engineering drawings result in parts that match the design intent.

  2. Budget - Getting a drawing right the first time saves money.

  3. Time - When dimensions and tolerances are stated clearly and thoroughly, manufacturers do not need to take the time to ask questions or get clarification.

  4. Customer satisfaction - Producing the correct results in a timely manner keeps customers happy.

So how does a engineer learn more about GD&T if it's not commonly part of the standard curriculum? The American Society of Mechanical Engineers (ASME) offers the Y14.5 - 2009 Dimensioning and Tolerancing specification. This set of guidelines describes the language of GD&T and establishes uniform practices for communicating the requirements on engineering drawings. Additional resources include training programs and traveling seminars.

Q-PLUS Labs offers both training and consulting services to help ensure that your manufacturing process goes as smoothly as possible. Our training programs are designed for small groups across multiple disciplines so that engineers, manufacturing staff, and other key players can learn how to most effectively communicate in the language of GD&T. Contact us today to learn more about how we can help you.

Are you an engineer in the field of manufacturing? Tell us in the comments section how you learned about GD&T.


Read More

Topics: dimensional measurement, dimensional inspection, reverse engineering, metrology